Thursday, March 21, 2019
Dodeca Essbase Outline Viewer
Dodeca allows you to easily give users the ability to view Essbase outlines. Watch this video for a quick demo then check out Jason Jones' blog about how to set it up.
Wednesday, March 13, 2019
OAC Next Generation Outline Extractor
The Oracle Analytics Cloud (OAC) Next Generation Outline Extractor is now available for download from the Applied OLAP website. I've also added a few tips for using it.
Background

Version


Source


Background
- For those unaware, Applied OLAP supports a free utility for extracting Essbase outlines. The utility is simple to install and use. I've used it many times over the years. One client of mine used it to extract dimensions so they could be compared to the source relational tables during UAT saving many hours of work.
Version
- On your OAC interface page, click on your name in the top right corner. Then select About. Download the version of the Outline Extractor that corresponds to your cloud version. In this case the version is 12.2.1.1.114.

Source
- Using the Essbase API will result in many calls to the server and could be very slow. Instead, on the Input Source choose "Extract and Process MaxL Outline XML".

Connection
- When making a connection, use the URL that you use in your browser to connect to the OAC interface. After the 'essbase' part of the URL place '/japi' just like you see below. Then enter your Username and Password.

As always, let us know if you have any issues at Support@AppliedOlap.com.
Monday, March 11, 2019
Cascade Reporting in Dodeca
Cascade reports are multiple reports that show a standard template from different points of view. This post will show how to create a Dodeca Cascade Report using an MDX script to choose the intersections.


I started with a template that shows scenarios and a single roll-up account: EBITDA. This account will be automatically zoomed-in to create our final report. Using a roll-up will ensure that any account changes are reflected in our report without needing future maintenance.
I also added tokens for Periods, Location, Departments and Years. I added an Excel formula using simple subtraction to find the previous year.

I added two named ranges. One for the Essbase retrieve and another for the cell on which the zoom-in will be performed.

I hid the header rows and saved the template.

Next I created an Essbase MDX Script called PaloMartCascade.
I used the Crossjoin() function to create my column headers of Periods and Scenarios.
I also used the Crossjoin() function to pull all level zero members under the user selected Department and Location.
Note the use of the NON EMPTY keyword here. Using this will ensure that no sheet will be generated for any missing or irrelevant intersections.

Next I set my view properties, specifically for CascadeSources.

In the Cascade Sources dialog I changed the Source Type to EssbaseMdxScript. Note that this feature is only available in version 7.6.1 and beyond.
I then selected the Script I created in the previous step.
I also set the tokens that will be used to generate the Cascade Report. In this case, the MDX report will return Departments in the first column and Locations in the second column. The order that the tokens are defined should match the order in which they are retrieved in the MDX report.

Finally, I added a bit of Workbook Scripting.
First I added a property called SheetCount and set the Value to 0. This will track how many sheets get built during the Cascade.

Next I added an EventLink that will be triggered by the AfterCascadeSheetBuild. This will be fired after each individual sheet is built.
The first method in this procedure is AddProperty. This method uses the @PVal() Dodeca function to get the current SheetCount property and increment it.

The next method in the OnAfterCascadeSheetBuild Procedure is EssbaseZoomIn. This is the method that will drill in on the EBITDA account on our template. Note how I reference the zoom.cell in the SelectedRange. If we move the cell at some point we won't have to update this Workbook Script.

The next procedure I added was OnAfterBuild. This will be used to show a message box to the user. I use the @PVAL() Dodeca function to get the final SheetCount property.

Then I used the AddProperty method to set the SheetCount back to zero. This will ensure that the property does not keep adding to previous cascades if the view is built again.

There you have it. Creating Cascade Reports in fast, flexible and powerful in Dodeca. From here you could add a Workbook Script to save the sheets to individual files or send them in emails.
Monday, March 4, 2019
Dodeca Commentary Part Three
This is part three of three in my series on Commentary in Dodeca. In this part I will focus on the double-click event that opens an adhoc view. The action is done completely with workbook scripting.
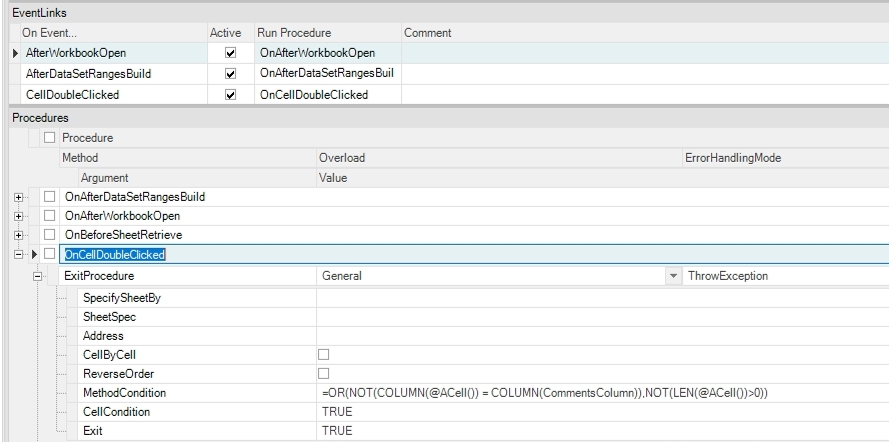
First I created an event link to capture a cell being double clicked. The first method I added to the OnCellDoubleClicked procedure was ExitProcedure. I added this method first because I don't always want the double click event to open a view. I only want it to open the view when the double click happens in a valid cell. I defined that valid cell using an Excel formula and the Dodeca @ACell() function.
In this case the procedure will exit if the double-click happens anywhere but the CommentsColumn range. It will also exit if the cell is empty.
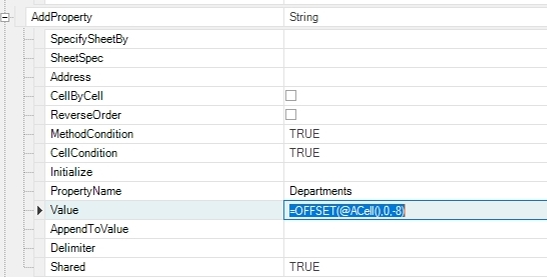
Next I added five methods to set Properties. These properties will correspond to the members in the row that was double-clicked. They will be shared with the adhoc view. Once again I'm using an Excel formula and the @ACell() Dodeca function. In this method, the Departments property is being set.

In this method, the Periods property is being set.
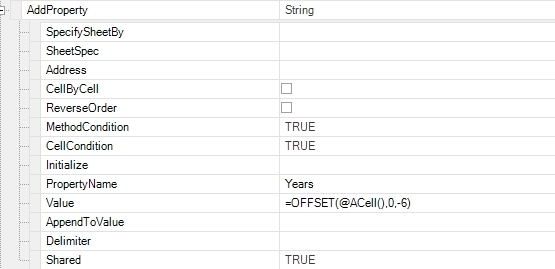
In this method, the Years property is being set.

In this method, the Measures property is being set.

In this method, the Location property is being set.
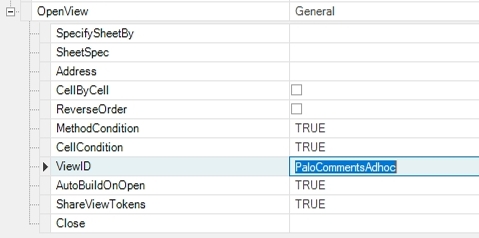
Finally, I called the OpenView method. I specified an AdhocEssbase View called PaloCommentsAdhoc.
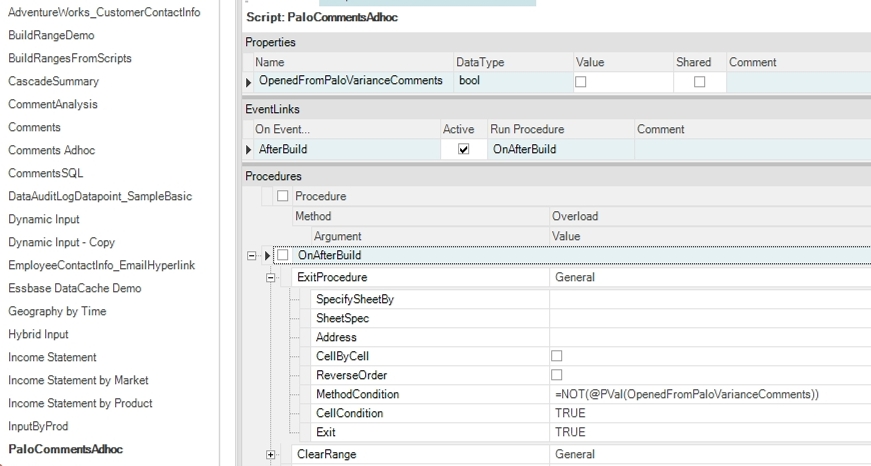
In the PaloCommentsAdhoc Workbook Script I added one Event Link. The AfterBuild event will add the members to the sheet in this example.
Again, the first method I called was ExitProcedure. In this method I check to see if the view was opened from the PaloVarianceComments procedure. I checked the value of the variable using the @PVal Dodeca function. If the view is opened by a user, this procedure will exit and they will be able to use the view as a normal Essbase Adhoc View.
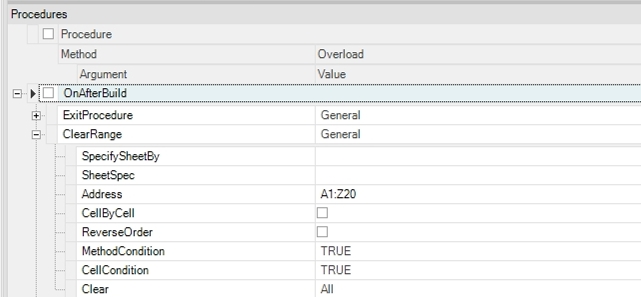
Next I used the ClearRange method to clear the sheet.

I then used the SetEntry method to populate the sheet with the member names from the properties I created in the previous Workbook Script. In this case I'm setting cells D2:F2 to the Years member.

Next I put the Periods value into cells D1:F1.
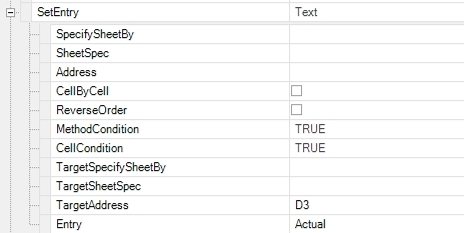
Next I put Actual into cell D3.
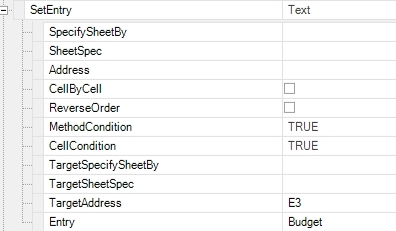
I put Budget into cell E3.
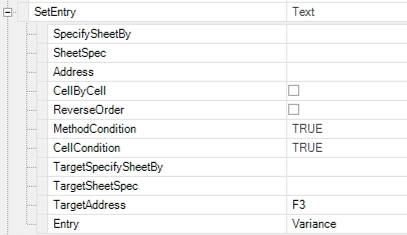
I put Variance into cell F3.
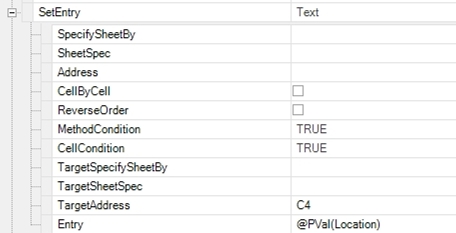
I put the Location into cell C4.
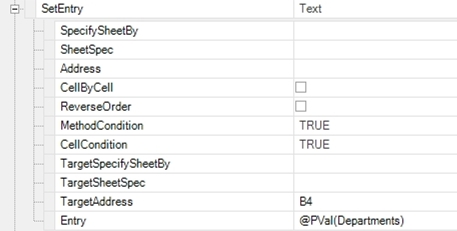
I put the Departments member into cell B4.
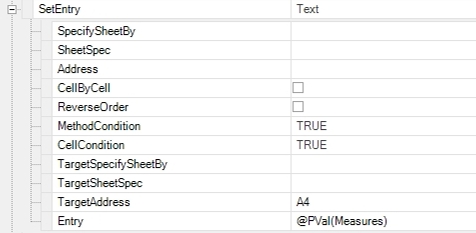
I put the Measures member into cell A4.
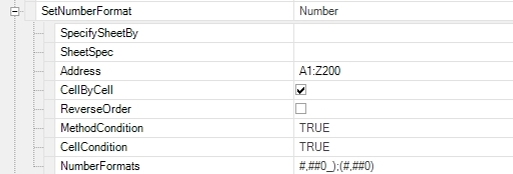
Since this is an adhoc view, I can't create a template with the formats I want. So I used the SetNumberFormat format the numbers the way I wanted.
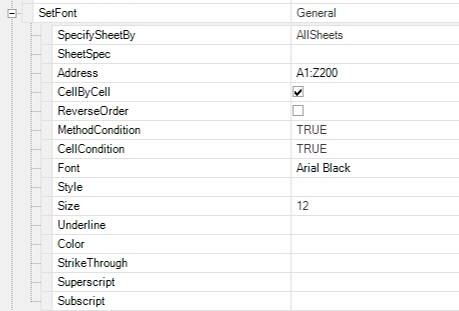
I then set the font to the one I wanted.
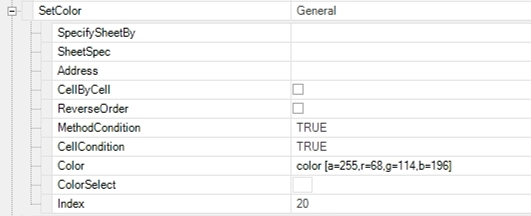
Next I set an index color. This method allows you set the a number corresponding to the color you want. You can define the color using R/G/B values in the format shown here.
Next I set a color index using the ColorSelect property. Using an index on your views allows you to update multiple places that color value is used in a single place.
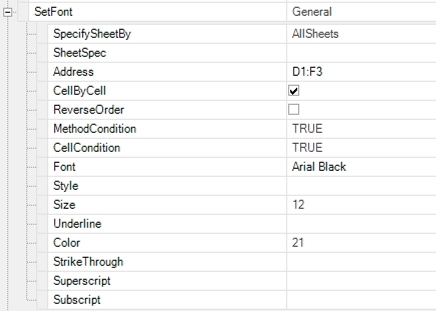
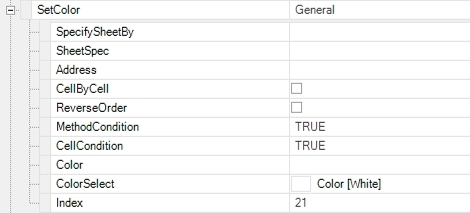
Next I set the font color on the header to be color index 21 which I set in the previous step.
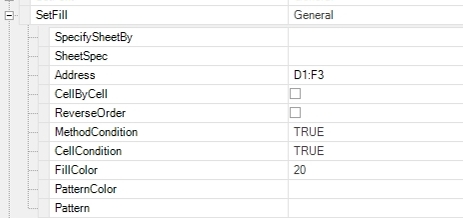
Next I set the cell background color for the header to be blue.
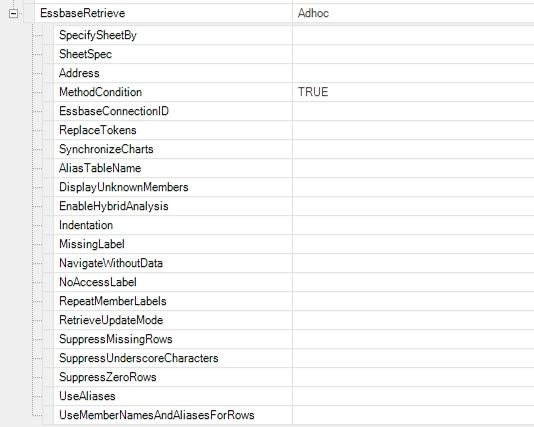
The last method I called was EssbaseRetrieve. This will perform a retrieve on the adhoc sheet that was just set up and formatted.
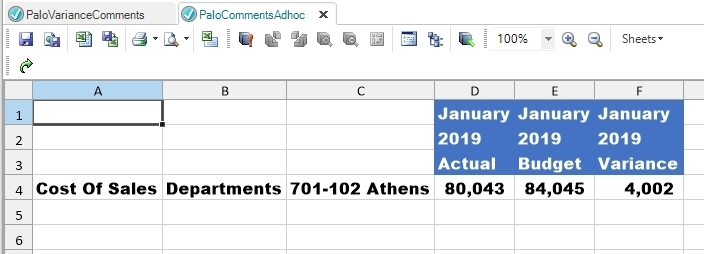
We end up with an adhoc sheet that has the members we want and the formatting we want. There are probably several other ways of doing this but I chose the aforementioned methodology in this case.
That concludes this three part series. From entering the comments, to viewing all comments on a single sheet, to doing analysis on a line. Dodeca Does It!
Subscribe to:
Posts (Atom)